Pour Stéphane, à ton chalumeau.....ça à l'air simple comme ça

How to build a bike from scratch, (well almost) ...
Step 1 - Do some research...
I found two really good websites with a wealth of information on building motorcycle frames:
WWW.EUROSPARES.COM has tons of information, a forum for discussing frame construction methods/materials, and offers some books that although they are expensive, I would consider must haves. “The Racing Motorcycle – A technical guide for constructors” Books I & II by John Bradley. Covers everything from general frame layouts, aerodynamics, and gearing, to detail calculations of spring forces required to select spring rates for the suspension. Highly recommended. Book II is just out and I haven’t seen it yet, but it seems to cover the more practical aspects of frame construction. Don’t let the prices scare you. There is not a lot of information available on this subject, and if you are going to do an original design, you can save a lot of time and effort using the information in these books.
WWW.TONYFOALE.COM is another site that covers many aspects of frame design and construction. He also offers a book, “Motorcycle Handling and Chassis Design”, that is well worth having. Tony has been around for a long time and has built many custom framed bikes, including a frame for a CB400F.
I picked up another book while at Mosport this summer watching a round of the Canadian Superbike series. “Motorcycle Design and Technology” by Gaetano Cocco, (head Engineer at Aprilia). This is an interesting read as he breaks down a lot of the engineering calculations dealing with chassis forces, aerodynamics, weight transfer, gyroscopic forces, all kinds of information. There is even a section on why racebikes have moved away from single sided swingarms.
Even if you are not planning to build your own frame, I highly recommend visiting these sites, and if you can afford it, ordering the books. They really are an interesting read, and go into detail explanation on how a lot of the “facts” of chassis materials and design as we know it today is really a load of crap in some cases, developed by the manufacturers to sell new motorcycles.
Step 2 – Establish some physical parameters
It was my intention from the start to use many of the components that I already had on hand to make my first attempt at building a bike. I knew it would be built around my CB400-F engine/carbs, I had an Ontario Moto Tech exhaust, I had the rolling chassis from a VF500 to provide wheels/brakes/forks/swingarm, and I had existing body work that had a custom paint job that I didn’t want to just throw away.
Using these existing components established most of the rough parameters for wheelbase, type of frame, and general layout and looks of the finished bike, but still left lots of detail decisions to be made. Exact frame layout and construction methods, rake/trail, and swingarm pivot location, all needed to be sorted before any construction could commence.
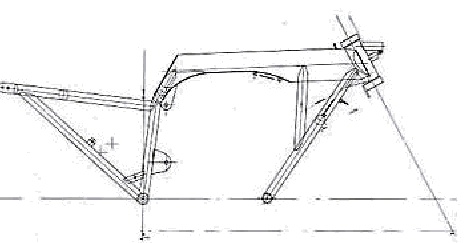
I made a fairly large decision very early on to go with an “Egli” style large backbone frame. This style of frame is well suited to using the engine as a stressed member, which simplifies the frame and engine mounts, offer good resistance to axial twisting, and would allow the use of the stock fuel tank. The last item being important to me to save an existing paint job. I also decided not to veer too far off the straight and narrow, and copied the existing geometry of the VF500, which was renowned for it’s light, neutral handling.
Sketch of an Egli style frame
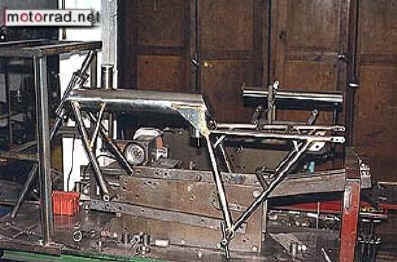
And an actual Egli frame on a jig
Step 3 - Model the existing engine and chassis components in 3D
I do design work for a living, so it was easy enough to measure the engine, wheels, forks, swingarm, etc. at home during the evening, and then enter them into the CAD system at work on lunch break, or before/after working hours. Once all the components were done, it is a fairly easy process to position all the components, and start designing the chassis around them.
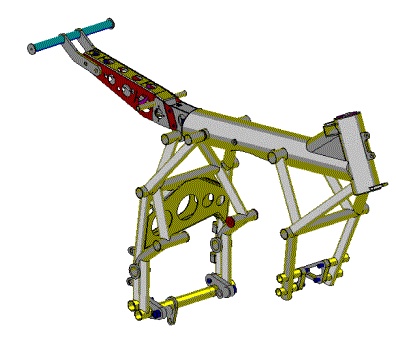
CAD Model of frame
Step 4 – Assemble equipment for your shop
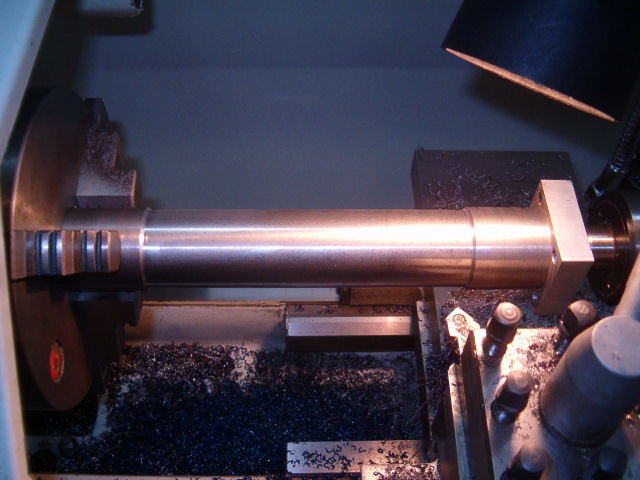
Certainly the most expensive piece of equipment you will need to own, or have access to is a lathe. It turns some of the harder aspects of construction into child’s’ play. You will use it to turn out an endless supply of spacers, short sections of tubes, threaded inserts, bearing races, shouldered nuts and bolts, etc. etc.. It doesn’t need to be a big one, as most of the parts will be quite small, but the bigger you get the more you can do.
I chose a 3 in 1 lathe/mill/drill from www.Shoptask.com . The quality as delivered leaves a bit to be desired, but after some set up, tightening of bolts, and getting used to it’s inherent limitations, it is quite amazing what you can do on it. There are similar machines from other companies, but what sold me on this one was that it came ready to be converted to CNC.
With CNC it is easy to program the machine to cut an arc in the main backbone to clear the throttle linkage.
I bought mine in 2000, and since that time there have been some substantial changes to the unit that addresses some of the limitations of my machine. The new models offers vertical movement of the mill head that really increases its work capacity, and cuts down on set up time. Of course the price has gone up accordingly.
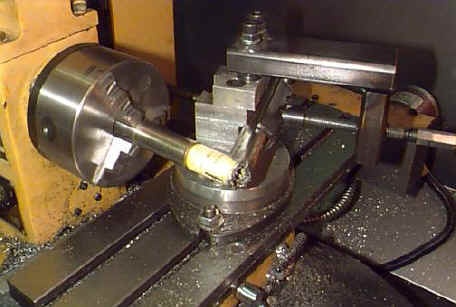
You are going to require a way of notching tubing. You can purchase a tube notcher for use with a hand drill, or drill press, from www.Protools.com or www.trick-tools.com , but I built one starting with the rotating base from a vice. I can install this onto my lathe/mill, and notch tubing very accurately in two different planes depending on if I put the cutter into the lathe chuck, or into the mill head. This makes cutting mirror image tubes much easier, and helps to ensure that the frame tubes I cut match my design model as close as possible.

Notching 1” O.D. x 0.045” wall tubing
Notching 2.5” Diameter Hole for the steering head
You are also going to need a way to weld everything together, and there are really three choices. Brazing, TIG, and MIG.
Brazing is by far the cheapest method, both is term of equipment costs and consumables. This is an excerpt from the Eurospares website on brazing;
“Braze welding is much easier on the tubing since you don't get over a dull cherry red temperature. The drawback is the bronze contracts more as it cools, so you have to work out your welding sequence. When I can control my impatience to weld the whole thing up NOW, I try to do a bunch of little tacks, moving symmetrically around the frame, and then go back and do .5 to 1.0 " sections of bead in a similar pattern. Let the frame cool a bit between beads and things will hold their shape really well. Another nice thing about the brazing is you can do a reliable visual inspection of the joint. If too cold, the bronze won't "tin" the metal ahead of the fillet, and if too hot it flows out like water.”
If you are only going to own one piece of weld equipment and you want to tackle materials other than mild steel, then TIG welding is the way to go. With an AC/DC Tig welder you can weld Mild steel, Stainless steel, Aluminum, Titanium, Copper, Brass, and the list goes on. Sounds great doesn’t it? But Tig welding is not without it’s downsides. IT IS EXPENSIVE. If you only want to weld Mild steel, then some of the new DC only machines can be bought for under $1000.00US or less. These are very compact (about the size of a lunch box) and light, but again you are limited to Mild steel. When I was choosing a Tig welder I ended up buying a Lincoln PRO 175. This is a Square Wave welder with an 8 – 175 Amp range, that is good for materials ranging from 0.030” – ¼” thick. Although the PRO 175 is still available, there is a newer version called the Precision 185 that offers more adjustment and control over both the Wave pulse, and the gas flow.
The process itself is slow and expensive. The weld speed is typically in the 2 – 5 inch per minute range, and you are using argon gas not only during the weld process, but even after you stop! Tig welders use a “postflow” that keeps the argon gas flowing after the arc stops to shield the still molten material until it cools down. Just to give you an idea, I have had a MIG welder for about 10 years that I have used to build a trailer, portable sign, shelving, gusset a bike frame, etc, and in that time I have gone thru about 4 small tanks of BlueShield weld gas. That same size tank of argon lasts about 3 or 4 days of working on a project like a bike frame. At around $45US a fill, I spent almost $350US learning, practicing, and building my first frame. But if you have spent much time arc or mig welding, your first time on a tig welder will seem like a revelation. The control over the weld puddle is amazing, you can hold the puddle in one spot indefinitely, and there is no smoke or splatter if the parts are properly cleaned.
The Eurospares web site recommends avoiding MIG welding for anything but building trailers, and this is true to a point. It is easy to be fooled into buying a cheap mig welder, but if you want to weld material down to 0.030” range you need one that is microprocessor controlled. This will set you back somewhere in the $1800 - $2500US mark, the same or even a bit more that the TIG welder. The long-term advantage is they are much easier to learn on, cheaper to operate, and faster to weld with. Weld rates up to 24 inches per minute would be typical.
Ideally your shop would be equipped with all 3 sets of equipment. It is much easier to tack parts together with the mig welder, you can hold the part in one hand, point the gun and pull the trigger with the other. Once the parts are tacked, you can wire brush them clean, and then finish them with the tig welder. The tig process often requires some filler, even on a tack weld, and that dictates both hands are already busy holding the torch and filler rod, meaning that the part must be held in position by some other means. The gas welder is nice to have as it is very versatile, and can be used to braze, cut, and heat parts to be bent. Sometimes a part that has warped or moved from the weld process can be heated and straightened with the gas torch, saving a lot of time and headache.
Step 5 – Design and Build a frame jig
Doing a bit of research on the internet, I came across a really good site that explained a lot of the principals of actually building a frame jig, and the actual frame. WWW.EUROSPARES.COM offers books, articles, and a users forum for anyone interested in building their own frame.
I ended up designing and building my own adjustable jig that will handle pretty much anything from a chopper to a mini-bike.
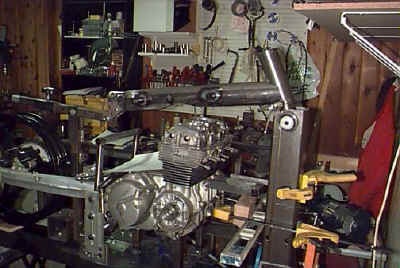
My jig, with engine, wheel, swingarm in place.
The steering head angle is adjustable, as is the swingarm pivot location in both the vertical and horizontal directions. The section of the jig that positions the swingarm pivot slides back and forth on the lower beam on a set of 4 adjustable bearings. Once the horizontal position is determined, it can be secured in place with a set of locks. The vertical positioning is handled with a set of machined aluminum plates attached to the sliding section with a set of machinists’ angle plates. These are cast steel plates that are precision ground to be flat and at 90 degree angles within +-0.0005 inch. The upper plates were squared and had the pivot holes bored while being clamped together in a vice, so once the jig is leveled during setup, the pivot location can be measured, a straight edge laid on top of the plates, and a machinist level used to ensure the swingarm pivot is located accurately and evenly.
Step 6 – Start Cutting and Welding Tubes
Now the real fun begins. I won’t go into great detail here, but I will give some hints/tips that I learned, some the easy way, and some the hard way.
BE PATIENT! - Tack weld the tubes evenly on 3 or 4 places around the circumference, and at both ends before you fully weld anything. Sometimes you have to fully weld something before you position another tube, but avoid it if possible.
Build the frame in sections. – It may be easier to make small jigs to build subsections of frame, and then position these subassemblies onto the main jig when they are complete. The side assemblies were done this way on my frame.
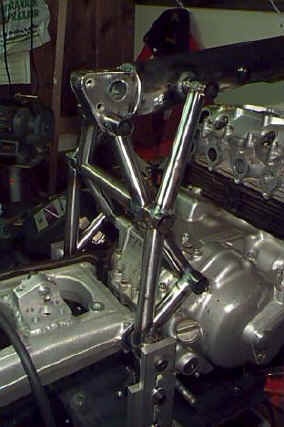
I built the two side assemblies on a small jig before transferring them onto the main jig. Once they were in position and bolted to the engine, I added in the cross tube to connect them.
The main backbone sub assembly was also fully welded on a separate jig and then transferred to the main jig. If you look back at the frame jig photo, you will see an additional piece of the jig that was used to position the rear of the backbone, and then the tubes were added in to connect the rear subassembly to the backbone
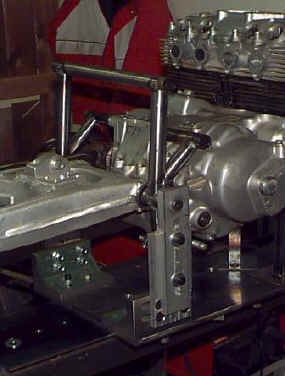
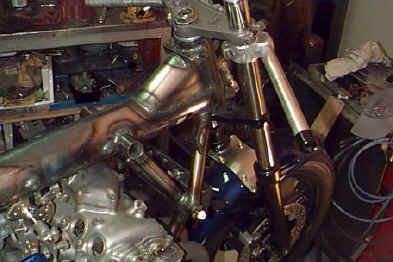
The front lower section was pre assembled and bolted to the engine. I don’t have an actual picture, so here is a CAD model.
Front Lower Sub Assembly
The weldment was then attached to the main assembly with 4 tubes. Does this look a bit stronger than a stock CB400-F steering head?
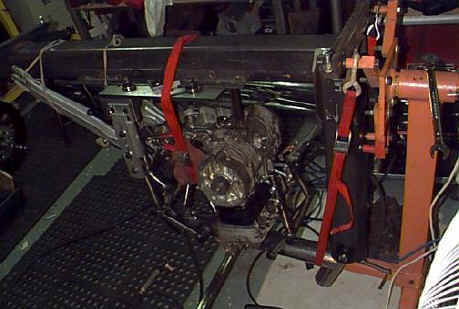
I took a trick from the racecar guys and used it for my project. I had seen pictures of weld stands for racecars that allowed the chassis to be rotated 360 degreed around the horizontal axis so that almost all the welding can be done from the top. I used an engine stand for a car, and adapted my frame jig so it could be bolted to it. This way I could rotate the entire jig/frame/engine together to get at most of the welds
As you can see below, the whole assembly can be rotated anywhere from straight up to straight down for welding
Weld as much as you can with the frame on the jig, and the engine in place – This helps to prevent warping or movement of the tubes. There will always be a few welds that you just cannot get at with the engine in place. Make these weld in small sections, (less than a ¼” at a time) alternate them from one side of the frame to the other if possible, and let them cool before going on to another one. You will hear the tubes move if you put too much heat into them
Don’t sweat it too much if all your tubes aren’t perfectly positioned. What is critical is the relationship of the steering head to the swingarm pivots. Try and keep them perfectly aligned. And in the end if they are not perfectly aligned, keep this in mind, you are not alone! In the 70’s and 80’s one of the first things done to the Kawasaki KZ900/1000 Superbikes was to cut off the steering head and reattach it to the frame. In some cases they came from the factory up to ¼” off center. I’m not saying that it is a good thing, but if you had the steering head/swingarm pivot relationship correct to begin with, and you did as much welding as possible with the frame and engine in the jig, you probably don’t have anything to worry about.
Frame/jig/engine on engine stand can be rotated to get at most of the welds
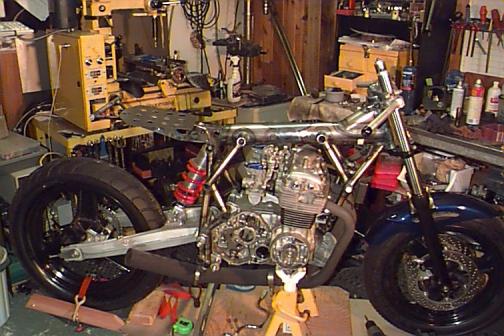
The finished rolling chassis!


 quoi que...un petit poutre avec les cotes d'un 500 Four .....
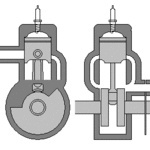


 , il parait que je dois recuperer un cul de selle en poly chez toi en meme temps. est ce que tu l as?